iOS の TensorFlow サンプルを試してみる

TensorFlow(テンソルフロー) や iOS でのサンプル実行の方法を調べたメモ。


https://www.tensorflow.org/lite?hl=ja

iOS で TensorFlow を動かすには TensorFlow Lite を使用すると良い。
TensorFlow Lite はモバイルや組み込みデバイス向けにチューニングされた TensorFlow のバージョンである。

CocoaPods で導入するにはこうする。

platform :ios, '13.0'

target 'TargetName' do
  use_frameworks!

  pod 'TensorFlowLiteSwift'

end


https://www.tensorflow.org/lite/examples?hl=ja

実際にどんなことができるか、どんな動きになるかを試したい場合は、ここに各パターン(画像分類やセグメンテーションなど)のサンプルアプリのリンク(GitHub へのリンク)がある。

しかし GitHub 上にはあるが、上記のサンプルのコレクションページにはない物もあるので GitHub の examples を直接見た方が良いだろう。

https://github.com/tensorflow/examples/tree/master/lite/examples


AI / 機械学習というジャンルでは「推論結果を出したい」の前に、その推論に使用するモデルを用意する必要があるので骨が折れそうなイメージがあるが TensorFlow では、学習ずみのモデルを公開しているのでそれを使用することができる。

https://tfhub.dev/

ちなみに Apple の CoreML で TensorFlow のモデルを使用したい場合は、 CoreML 形式にコンバートされたモデルが Apple のサイトにあるので、ダウンロードできる。

https://developer.apple.com/machine-learning/models/


実際にサンプルを試すには各サンプルのルートで pod install してからワークスペースを実行するだけで OK。

たとえば以下のような物がある。


ImageSegmentation

画像に含まれる物体を分解できる。 人と背景や犬などが画像上のどのピクセルなのかを特定できる。

f:id:daisuke-t-jp:20200918090303p:plain:w250


StyleTransfer

ソースとなる画像にスタイルを適用することができる。

たとえば ソースの写真がこれで
f:id:daisuke-t-jp:20200515195125p:plain:w200


適用するスタイル画像にこれを選ぶと(ゴッホの星月夜)
f:id:daisuke-t-jp:20200515195131p:plain:w200


スタイル適用された画像はこう出力される。(ちょっとゴッホぽくなった)
f:id:daisuke-t-jp:20200515195137p:plain:w200


という感じにサンプルとコードを見ている中でいくつか気になる点が出てきたので、プルリクエストを送ってみた。

https://github.com/tensorflow/examples/pull/214 https://github.com/tensorflow/examples/pull/215 https://github.com/tensorflow/examples/pull/216 https://github.com/tensorflow/examples/pull/217

内容は、ダークモード時に UI が一部見えなくなる、不要なメモリ確保をしている、など。

無事プルリクエストはマージされたので、今後サンプルから学ぶ人のちょっとした足しになれば、いいなぁ、、、と。

それと、「不要なメモリ確保を削除」の PR が受け入れられたということは自分の TensorFlow Lite の認識(の一部)が、正解とズレていなかった証明になるので、安心した。。

pod install と update の違い。あと deintegrate

pod install / update をいままで何となく使っていたので、違いを調べる。

https://guides.cocoapods.org/terminal/commands.html

コマンドのマニュアル↑をみると

  • install
    • Podfile.lock に記載されているバージョンで、依存関係をインストールする
  • update
    • 古い依存関係を更新し、あたらしい Podifle.lock を作成する

となる。

使いわけとしては Podfile.lock がプロジェクトにあり、そこに書かれているライブラリのバージョンにて開発する場合は pod install をする。 もし、ライブラリのバージョンを更新したい場合は pod update を使用する。という感じになる。

実際の使い分けのケースとしては、複数メンバで開発している場合だと、開発時のライブラリバージョンを統一したい時は、リポジトリに Podfile.lock を追加し、各自 pod install でライブラリをインストールする流れにすると、バージョン差異の問題が起きない、ということができる。


あと pod deintegrate というコマンドもあるが、これを実行すると CocoaPods の統合を解除することができる。

具体的には

  • Xcode のプロジェクト(xcodeproj)から CocoaPods の記載を削除する
  • Podfile, Podfile.lock は残る

という感じなので、リポジトリに push したタイミングで自動ビルド(pod install から始まる)をしたい時は deintegrate された状態で、バージョン管理していくといいかもしれない。

SwiftUI で GoogleAdMob バナーを表示する

SwiftUI で GoogleAds のバナー広告を表示するサンプルを作った。


方法としてはまず GADBannerView を表示する UIViewController を用意する。

class GADBannerViewController: UIViewController {
    
    let bannerView = GADBannerView(adSize: kGADAdSizeBanner)
    
    
    override func viewDidLoad() {
        super.viewDidLoad()
        
        // This app using sample id.
        // https://developers.google.com/admob/ios/test-ads#sample_ad_units
        bannerView.adUnitID = "ca-app-pub-3940256099942544/2934735716"
        
        bannerView.delegate = self
        bannerView.translatesAutoresizingMaskIntoConstraints = false
        bannerView.rootViewController = self
    }
    
    override func viewWillAppear(_ animated: Bool) {
        super.viewWillAppear(animated)
        
        bannerView.load(GADRequest())
    }
    
    override func viewWillDisappear(_ animated: Bool) {
        super.viewWillDisappear(animated)
        
        bannerView.removeFromSuperview()
    }
    
}


// MARK: - GADBannerViewDelegate
extension GADBannerViewController: GADBannerViewDelegate {
    func adViewDidReceiveAd(_ bannerView: GADBannerView) {
        
        guard let viewController = bannerView.rootViewController else {
            return
        }
        
        guard bannerView.superview == nil else {
            return
        }
        
        
        viewController.view.addSubview(bannerView)
        viewController.view.bringSubviewToFront(bannerView)
        
        viewController.view.addConstraints([
            NSLayoutConstraint(item: bannerView,
                               attribute: .bottom,
                               relatedBy: .equal,
                               toItem: viewController.view.safeAreaLayoutGuide,
                               attribute: .bottom,
                               multiplier: 1,
                               constant: 0),
            NSLayoutConstraint(item: bannerView,
                               attribute: .centerX,
                               relatedBy: .equal,
                               toItem: viewController.view,
                               attribute: .centerX,
                               multiplier: 1,
                               constant: 0)
        ])
        
    }
}


次に UIViewController はそのままだと SwiftUI で使用できないので SwiftUI 用に UIViewControllerRepresentable でビューコントローラーを wrap する。

struct GADBannerViewControllerRepresentable: UIViewControllerRepresentable {
    
    typealias UIViewControllerType = GADBannerViewController
    static let adsBannerSize: CGSize = CGSize(width: 320, height: 50)
    
    
    func makeUIViewController(context: Context) -> UIViewControllerType {
        return .init()
    }
    
    func updateUIViewController(_ uiViewController: UIViewControllerType, context: Context) {
    }
    
}


最後に UIViewControllerRepresentable を SwiftUI の View に配置すれば、広告が表示される。

struct ContentView: View {
    var body: some View {
        
        NavigationView() {
            VStack {
                Spacer()
                
                Text("SwiftUI GoogleAdsSample")
                
                Spacer().frame(height: 30)
                
                NavigationLink(destination: ContentView2()) {
                    Text("Link to Next View.")
                }
                
                Spacer()
                
                GADBannerViewControllerRepresentable().frame(width: GADBannerViewControllerRepresentable.adsBannerSize.width,
                                                             height:GADBannerViewControllerRepresentable.adsBannerSize.height,
                                                             alignment: .center)
            }
            .navigationBarHidden(false)
            .padding()
        }

    }
}

Google AdMob (iOS)バナー広告のサンプルコードで「bottomLayoutGuide」の警告が出る件

https://developers.google.com/admob/ios/banner

2020/04/29 時点で、サンプルコードが以下になっているが

func addBannerViewToView(_ bannerView: GADBannerView) {
    bannerView.translatesAutoresizingMaskIntoConstraints = false
    view.addSubview(bannerView)
    view.addConstraints(
      [NSLayoutConstraint(item: bannerView,
                          attribute: .bottom,
                          relatedBy: .equal,
                          toItem: bottomLayoutGuide,
                          attribute: .top,
                          multiplier: 1,
                          constant: 0),
       NSLayoutConstraint(item: bannerView,
                          attribute: .centerX,
                          relatedBy: .equal,
                          toItem: view,
                          attribute: .centerX,
                          multiplier: 1,
                          constant: 0)
      ])
   }


bottomLayoutGuide

'bottomLayoutGuide' was deprecated in iOS 11.0: Use view.safeAreaLayoutGuide.bottomAnchor instead of bottomLayoutGuide.topAnchor

の警告が表示されるとおり iOS 11 以降では非推奨なので、以下のように safeAreaLayoutGuide を使用すると警告が出なくなる。


この時、気を付けたいのは bottomLayoutGuide -> view.safeAreaLayoutGuide だとアプリ実行時に crash するため、 同時に attribute.bottom -> .top に変更する必要もある。

      [NSLayoutConstraint(item: bannerView,
                          attribute: .bottom,
                          relatedBy: .equal,
                          toItem: view.safeAreaLayoutGuide, // bottomLayoutGuide
                          attribute: .bottom, // top
                          multiplier: 1,
                          constant: 0),

Swift TextField で入力した数内を金額(通貨)フォーマットにして表示する

https://github.com/daisuke-t-jp/SwiftCurrencyTextFieldSample

Swift のテキストフィールドで入力した数値を「金額(円)表記」するサンプルを作ってみた。

ユーロ(€),ドル($) ならば、小数点の考慮も必要だが、日本円ならばこんな感じで。。

Swift URLRequest のタイムアウトを発生させる

URLRequest のリクエストがタイムアウトになった時の動作をみたい時がある。

そういう時は URLRequest の initializer で timeoutinterval をとても小さな値(たとえば 0.0001 秒とか)にすると、タイムアウトを発生させて、動作を試すことができる。

こんな感じだ。

let url = URL(string: "URL")!
let req = URLRequest(url: url,
                     cachePolicy: .reloadIgnoringLocalAndRemoteCacheData,
                     timeoutInterval: 0.0001)   // すぐタイムアウト発生する

let task = URLSession.shared.dataTask(with: req) { data, response, error in

    if let err = error as NSError? {
        if err.domain == NSURLErrorDomain,
            err.code == NSURLErrorTimedOut {
            // タイムアウト発生
        }
        return
    }
}

task.resume()

UIResponder.keyboardDidShowNotification が他のアプリに切替した時にも通知される問題

iOS アプリでキーボードが表示されたイベントを知りたい時に UIResponder.keyboardDidShowNotification を通知を受ける。

コードは以下のたとえば下のようになる。

import UIKit
import os

class ViewController: UIViewController {
    
    override func viewDidLoad() {
        super.viewDidLoad()
        
        let textField = UITextField(frame: CGRect(x: 0, y: 0, width: 150, height: 34))
        textField.center = self.view.center
        textField.borderStyle = .roundedRect
        self.view.addSubview(textField)
        
        NotificationCenter.default.addObserver(self,
                                               selector: #selector(keyboardDidShow),
                                               name: UIResponder.keyboardDidShowNotification,
                                               object: nil)
        
        NotificationCenter.default.addObserver(self,
                                               selector: #selector(keyboardWillHide),
                                               name: UIResponder.keyboardWillHideNotification,
                                               object: nil)
    }
    
    override func touchesBegan(_ touches: Set<UITouch>, with event: UIEvent?) {
        self.view.endEditing(true)
    }
    
    @objc private func keyboardDidShow(notification: NSNotification) {
        // キーボードが表示になった時の通知
    }
    
    @objc private func keyboardWillHide(notification: NSNotification) {
        // キーボードが非表示になった時の通知
}


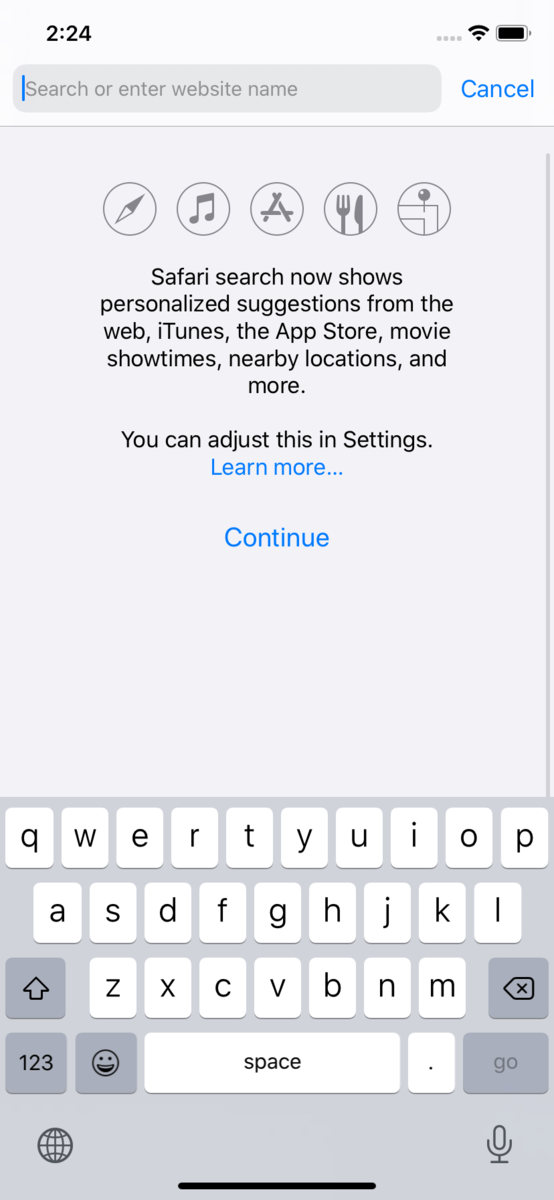
ただ、これだと「キーボードを開いている他のアプリ」に切替した時も、キーボード表示の通知がきてしまう。

例えば、以下のようにキーボードを開いている状態の Safari を開いた時などだ。

f:id:daisuke-t-jp:20200322142552p:plain:w300


このような問題があるので、どうやって自分のアプリ/他のアプリのキーボード通知を見分けるのか調べると、以下のドキュメントがあった。

https://developer.apple.com/documentation/uikit/uiresponder/1621603-keyboardislocaluserinfokey

keyboardIsLocalUserInfoKey

The key for an NSNumber object containing a Boolean that identifies whether the keyboard belongs to the current app. With multitasking on iPad, all visible apps are notified when the keyboard appears and disappears. The value of this key is true for the app that caused the keyboard to appear and false for any other apps.

つまり UIResponder.keyboardIsLocalUserInfoKey の値が true なら自分のアプリ、false なら他のアプリ、ということになる。

実際に下のようなコードで試すと、期待する結果が得られた。

@objc private func keyboardDidShow(notification: NSNotification) {
        guard let isLocalUserInfoKey = notification.userInfo?[UIResponder.keyboardIsLocalUserInfoKey] as? NSNumber else { return }
        
        print("keyboardDidShow ", separator: "", terminator: "")

        if isLocalUserInfoKey.boolValue {
            print("-> My app event")
        }
        else {
            print("-> Other app event")
        }
    }