macOS Big Sur(macOS 11)からはコマンドで Apple Archive の圧縮・展開ができる。

macOS Big Sur からはコマンドで Apple Archive (aar や lzfse)の圧縮・展開ができるみたい。

以下、コマンドの例。

単体ファイルの圧縮

% aa archive -i alice29.txt -o alice29.txt.lzfse -a lzfse

alice29.txt を圧縮した alice29.txt.lzfse を生成する。

単体ファイルの展開

% aa extract -i alice29.txt.lzfse -o alice29.txt

alice29.txt.lzfse を展開した alice29.txt を生成する。

フォルダの圧縮

% aa archive -D target_dir -o target_dir.aar -a lzfse

target_dir フォルダを圧縮した target_dir.aar を生成する。

フォルダの展開

% aa extract -i target_dir.aar -o target_dir  

target_dir.aar を展開した target_dir フォルダ を生成する。


コマンドのオプションなどは、こんな感じ。

% aa
Usage: aa command <options>

Commands:

   archive                    archive the contents of a directory
   extract                    extract files from an archive
   list                       list the contents of an archive
   convert                    convert an archive into another
   manifest                   alias for 'archive -manifest'
   verify                     compare dir contents with manifest
   check-and-fix              check and fix dir contents using manifest

Options:

   -v                         Increase verbosity level to stderr. Default is silent operation
   -h                         Show usage and quit
   -t n_threads               Number of threads to run for compression/decompression,
                              default 8 on this machine
   -wt n_threads              Number of writer threads to run (extract only),
                              default is number of worker threads
   -d dir                     Target directory for archive/extract,
                              default is current directory
   -subdir subdir             Target subdirectory under 'dir', name will be included in the archive
                              default is empty
   -D dir_and_subdir          Defines both 'dir' (dirname) and 'subdir' (basename)
   -i input_file              Input file, default is stdin
   -o output_file             Output file, default is stdout
   -a algorithm               Algorithm for archive compression, one of lzfse, lzma, zlib, lz4, raw (no compression),
   -b block_size              Blocks size for archive compression, integer with an optional suffix b, k, m, g
                              default compression options for archive: -a lzfse -b 4m
                              default compression options for other commands: -a lzfse -b 1m
   -enable-dedup (-no-enable-dedup)
                              If set, and SLC fields are present in the archive,
                              files with same data will be extracted as clones
                              Default is -no-enable-dedup
   -enable-holes (-no-enable-holes)
                              If set, and the filesystem supports it, detect and create
                              holes in files to store 0-filled segments
                              Default is -no-enable-holes
   -ignore-eperm (-no-ignore-eperm)
                              If set, ignore EPERM (operation not permitted) errors when setting files attributes
                              Default is -ignore-eperm
   -manifest                  Alias for the following options:
                              -exclude-field dat
                              -include-field sh1,cks,siz
                              -a lzfse -b 1m
   -list-format format        Output format for list, one of text, json                              default is text

Entry selection:

   -include-path path         Include entries matching `path`
   -exclude-path path         Exclude entries matching `path`
   -include-path-list file    File containing a list of paths to include with -include-path
                              (one per line, empty lines ignored)
   -exclude-path-list file    File containing a list of paths to exclude with -exclude-path
                              (one per line, empty lines ignored)
   -include-regex expr        Include entries matching `expr` (regex(3) syntax)
   -exclude-regex expr        Exclude entries matching `expr` (regex(3) syntax)
   -exclude-name name         Exclude entries with a path component equal to `name`

                              All the options above can be specified multiple times


Archive fields:

   -include-field fields      Add `fields` to the field key set
   -exclude-field fields      Remove `fields` from the field key set

                              `fields` is a comma separated list of fields, listed below
                              These options can be specified multiple times

   typ                        entry type (always included)
   pat                        entry path (always included for filesystem objects)
   lnk                        link path (always included for symbolic links)
   dev                        device id (always included for block/character devices)
   uid                        user id
   gid                        group id
   mod                        access mode
   flg                        BSD flags
   mtm                        modification time
   btm                        backup time
   ctm                        creation time
   dat                        file data
   siz                        file data size
   cks                        file data digest, POSIX 1003.2-1992 32 bit CRC
   sh1                        file data SHA-1 digest
   sh2                        file data SHA-256 digest
   sh3                        file data SHA-384 digest
   sh5                        file data SHA-512 digest
   xat                        extended attributes
   acl                        access control list
   duz                        file disk usage
   idx                        entry index in input archive
   yec                        file data error correcting codes
   yaf                        list of archive fields (metadata entry)
   attr                       alias for uid,gid,mod,flg,mtm,btm,ctm
   all                        alias for all fields (exclude only)

Entry types:

   -include-type types        Include only entries matching `types`
   -exclude-type types        Include only entries not matching `types`

                              `types` is a string including one or more of the characters below

   b                          block special
   c                          character special
   d                          directory
   f                          regular file
   h                          hard link
   l                          symbolic link
   m                          metadata entry (not a filesystem object)
   p                          fifo
   s                          socket
SwiftUI キーボードを表示時に特定の View を非表示にする

たとえばこんなコードで ScrollView 内に TextField を置いて、さらにスクロール位置によらないで常に画面下部にある View が表示されるような構成を ZStack で表現すると

import SwiftUI

struct ContentView: View {
    @State private var text: String = ""
    let bottomBoxHeight: CGFloat = 150
    
    var body: some View {
        ZStack {
            ScrollView(.vertical, showsIndicators: true) {
                VStack {
                    ForEach(0..<20) { (i) in
                        TextField("Textfield\(i)", text: $text)
                            .padding(EdgeInsets(top: 10, leading: 20, bottom: 10, trailing: 33))
                            .overlay(
                                RoundedRectangle(cornerRadius: 30)
                                    .stroke(Color(.systemGray3), lineWidth: 1)
                            )
                        
                        Spacer()
                            .frame(height: 10)
                    }
                    
                    Spacer()
                        .frame(height: bottomBoxHeight)
                }.padding()
            }
            
            VStack {
                Spacer()
                
                Group {
                    Text("Bottom box")
                        .font(.headline)
                        .foregroundColor(.white)
                }
                .frame(minWidth: 0, idealWidth: .infinity, maxWidth: .infinity,
                       minHeight: 0, idealHeight: bottomBoxHeight, maxHeight: bottomBoxHeight,
                       alignment: .center)
                .background(Color(.red))
            }
        }
    }
}

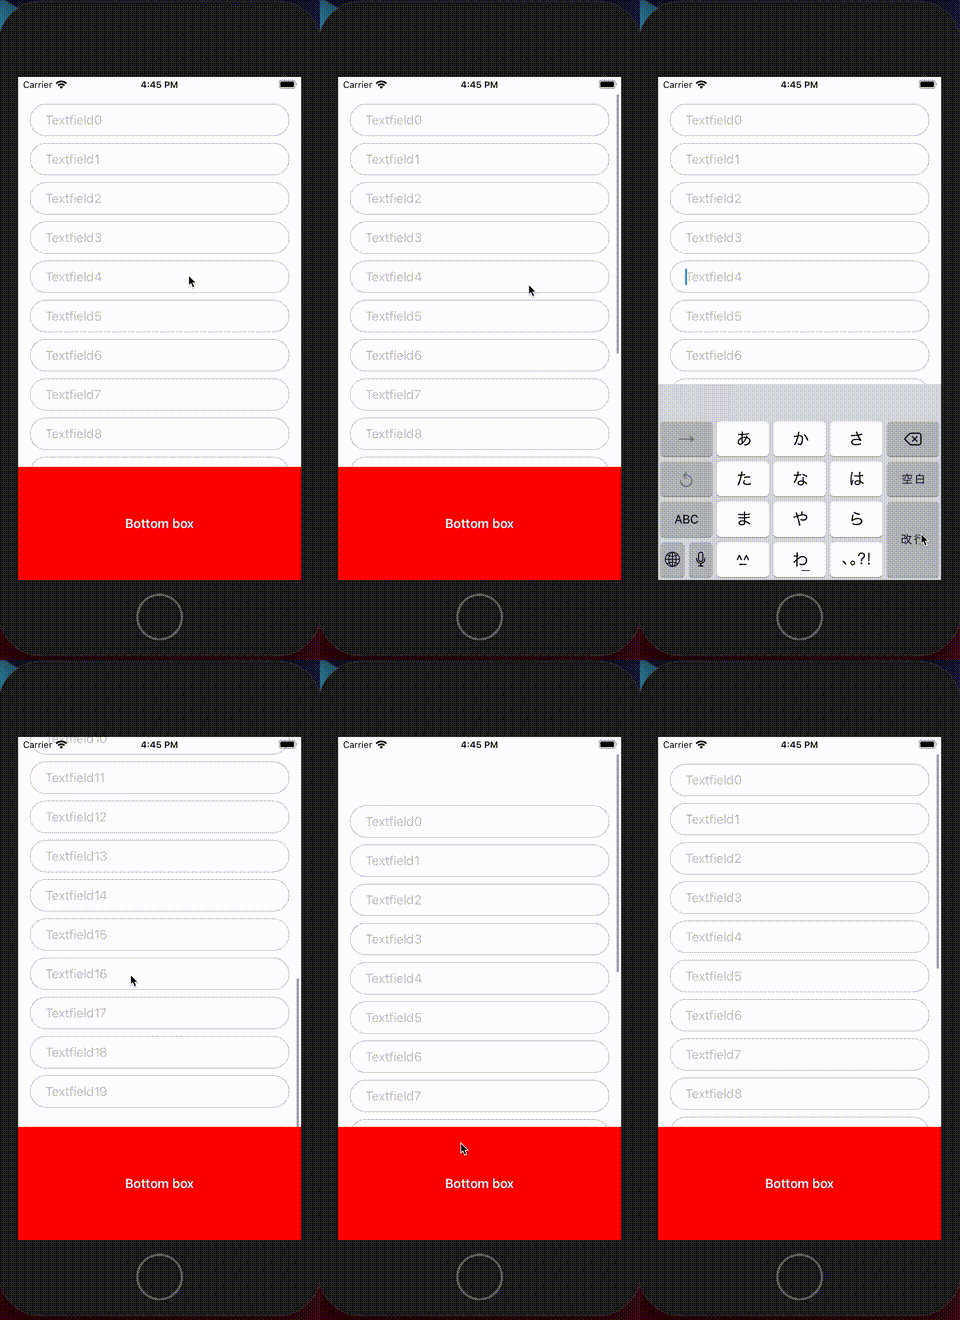
こういうふうに TextField のキーボードを開いた時に、キーボード上に View が重なってしまい、TextField が見えなくなってしまう。(入力できない)

キーボードを表示した時に特定の View を非表示にできれば解決しそう、と考えて調べてみると

KeyboardObserving というライブラリがあり、これを使って対応できた。

https://github.com/nickffox/KeyboardObserving

使い方は、まずアプリのエントリで最初の View を表示する部分のコードで .environmentObject(Keyboard()) を追加する。
(これをしないと、このあと追加するコードでクラッシュする)

import SwiftUI

import KeyboardObserving

@main
struct SwiftUIHideOnKeyboardSampleAppApp: App {
    var body: some Scene {
        WindowGroup {
            ContentView()
                .environmentObject(Keyboard())    // これを追加
        }
    }
}

あとは問題が起きている View に以下を追加する。

ScrollView(.vertical, showsIndicators: true) {
    KeyboardObservingView { // KeyboardObservingView にキーボード表示を監視したい View を追加する
        VStack {
            // .... 中略 ....
        }.padding()
    }
}

// .... 中略 ....

VStack {
    // .... 中略 ....
}
.hideOnKeyboard()    // キーボードを表示した時に非表示にしたい View に .hideOnKeyboard() を追加する

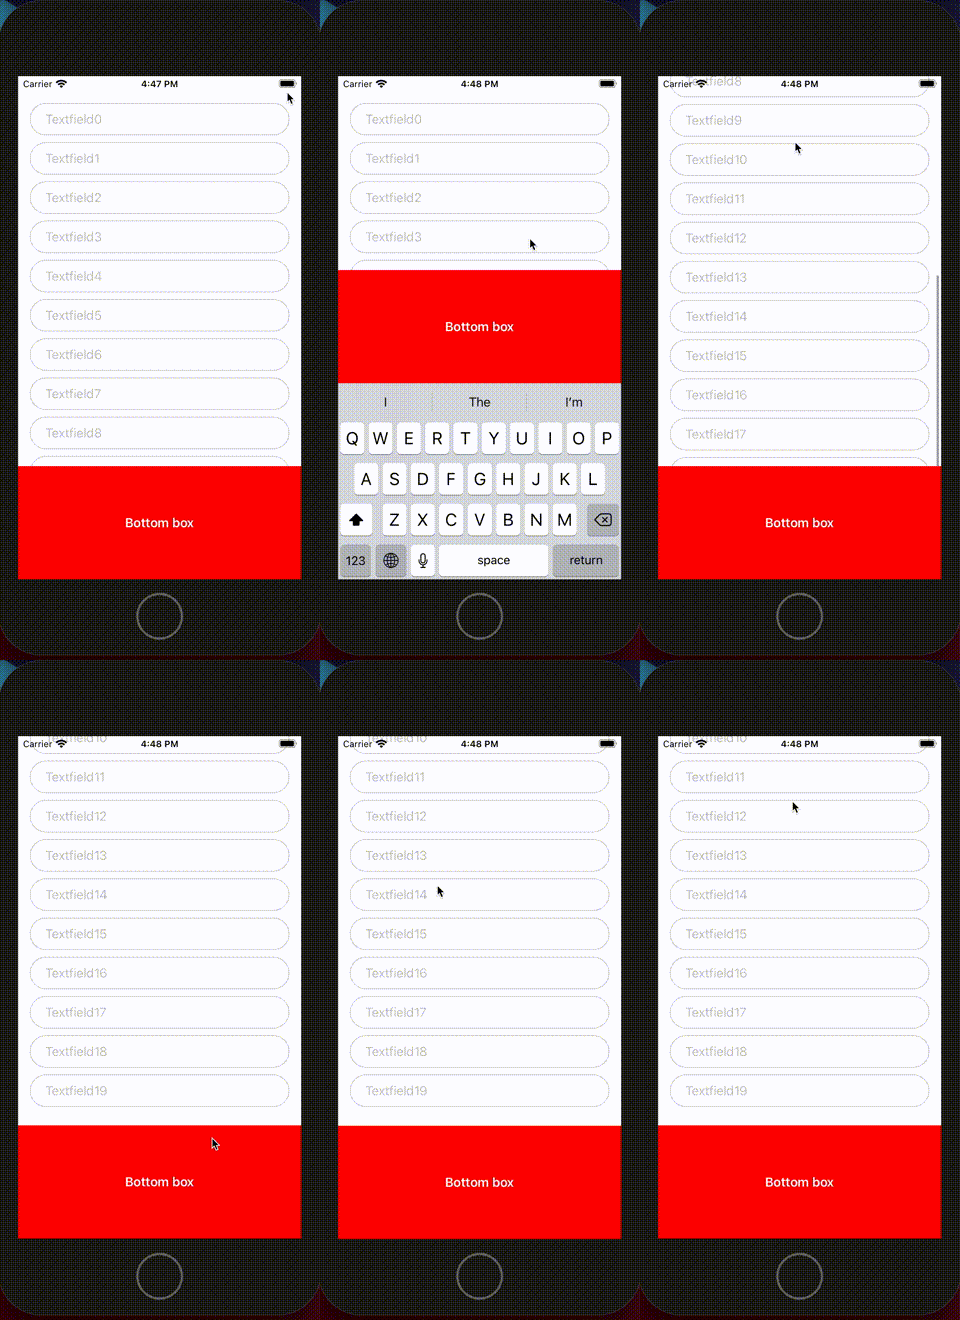
これでキーボード表示時に、TextField が隠されることは無くなった。

今回の記事の完全なコードは GitHub にある。

https://github.com/daisuke-t-jp/SwiftUIHideOnKeyboardSampleApp

mac で使用する Python のバージョンを Python 3 にする

mac のシステムでデフォルトインストールされているのは Python 2系。(Big Sur 時点)
これを Python 3系に変える。

brew インストール

% /bin/bash -c "$(curl -fsSL https://raw.githubusercontent.com/Homebrew/install/master/install.sh)"

pyenv インストール

% brew install pyenv

インストール可能な Python のバージョン一覧を確認。

% pyenv install --list

使いたい Python のバージョンをインストールする(例は 3.8.6)

% pyenv install 3.8.6

pyenv で管理されているバージョン一覧を表示する。
(先ほどインストールしたバージョンがあるはず)

% pyenv versions
* system
  3.8.6

システム全体で使用する Python のバージョンを指定する。

% pyenv global 3.8.6

~/.zshrc に以下の内容記載する(ファイルがなければ作成)
Catalina 以降は bash から zsh にシェルが変わっている。

export PYENV_ROOT="$HOME/.pyenv"
export PATH="$PYENV_ROOT/bin:$PATH"
if command -v pyenv 1>/dev/null 2>&1; then
  eval "$(pyenv init -)"
fi

ターミナルを再起動して、Pyhton のバージョンが切り替わっていれば OK

% python --version
Python 3.8.6

システムで使用している Python のパスが pyenv になっているかも確認できる。

% which python

/Users/<ユーザ名>/.pyenv/shims/python

既存の SwiftUI アプリのライフサイクルを iOS 14 の SwiftUI App に変更してみる

Xcode 11 を使って iOS 13 向けに作成されたSwiftUI のアプリだと AppDelegate と SceneDelegate のライフサイクルでアプリが作成されている。

Xcode 12 以降だと、プロジェクト作成時に SwiftUI のアプリのライフサイクルが選べるようになっている。

f:id:daisuke-t-jp:20201022013103p:plain:w500

選べるのは、以下だ。

既存の IUIKit App Delegate で作成した SwiftUI のアプリを iOS 14 以降の SwiftUI App のライフサイクルに変更する手順を以下にメモする。(iOS 13 は動作対象外になることに注意)

Info.plist

  • Info.plist の UISceneConfigurations の部分を削除する。

こうなっていたのが

 <key>UIApplicationSceneManifest</key>
    <dict>
        <key>UIApplicationSupportsMultipleScenes</key>
        <false/>
        <key>UISceneConfigurations</key>
        <dict>
            <key>UIWindowSceneSessionRoleApplication</key>
            <array>
                <dict>
                    <key>UISceneConfigurationName</key>
                    <string>Default Configuration</string>
                    <key>UISceneDelegateClassName</key>
                    <string>$(PRODUCT_MODULE_NAME).SceneDelegate</string>
                </dict>
            </array>
        </dict>
    </dict>

削除すると、こうなる。

 <key>UIApplicationSceneManifest</key>
    <dict>
        <key>UIApplicationSupportsMultipleScenes</key>
        <false/>
    </dict>

アプリのメインエントリを App プロトコルに変更

App から派生した struct を定義したファイルを作る。

WindowGroup に最初に始まる View を設定する。

import SwiftUI

@main
struct TestApp: App {
    var body: some Scene {
        WindowGroup {
            ContentView() // 最初に表示される View
        }
    }
}

既存の AppDelegate.swift, SceneDelegate.swift はプロジェクトから外して、ビルドされないようにする。

特に AppDelegate の @UIApplicationMain@main が両方存在すると、メインエントリが重複してしまいエラーになることに注意。

この状態でビルド→実行で、アプリ起動して View が表示されるところまで確認できる。

以下、Info.plist の UIApplicationSupportsMultipleScenes についての注意点。

既存のライフサイクルのアプリを、あたらしいアプリに置き換える際に UIApplicationSupportsMultipleScenes がもともと false の場合、インストール済みで起動しているアプリをあたらしいライフサイクルのアプリで上書きして実行すると、最初の View が表示されず黒い画面のままになる現象を確認した。(一度前のアプリを停止させてれば、画面は表示される)

UIApplicationSupportsMultipleScenes がもともと false で、ライフサイクル変更と共に true にして上書きインストールすると、上記の現象は起きなかった。

この時 UIApplicationSupportsMultipleScenes を変えるとアプリの動作にも影響があるため、変更する場合は気を付けたい。

UIApplicationSupportsMultipleScenes

既存の AppDelegate で実行している処理を新しいライフサイクルでも実現

AppDelegatedidFinishLaunchingWithOptions で初期化処理をしていたとする。たとえば Firebase とか。

class AppDelegate: UIResponder, UIApplicationDelegate {
    
    func application(_ application: UIApplication, didFinishLaunchingWithOptions launchOptions: [UIApplication.LaunchOptionsKey: Any]?) -> Bool {
        // Fireabase を初期化する
        FirebaseApp.configure() 

        return true
    }
}

これが新しいライフサイクルでも呼ばれるようにするには UIApplicationDelegateAdaptor というプロパティラッパーを使用して、従来の UIKit の UIApplicationDelegate の機能も利用できるようにする。

import SwiftUI

@main
struct TestApp: App {
    @UIApplicationDelegateAdaptor(AppDelegate.self) var appDelegate

    var body: some Scene {
        WindowGroup {
            ContentView() // 最初に表示される View
        }
    }
}


class AppDelegate: UIResponder, UIApplicationDelegate {
    
    func application(_ application: UIApplication, didFinishLaunchingWithOptions launchOptions: [UIApplication.LaunchOptionsKey: Any]?) -> Bool {
        // Fireabase を初期化する
        FirebaseApp.configure() 

        return true
    }
}

MIT License、Apache License 2.0 についてのメモ

OSS でよくみるMIT, Apache License 2.0 の意味がよくわからなかったので調べたことをメモ。

日本語でオープンソースライセンスについて書かれた資料は、 IPA情報処理推進機構)が提供している物が分かりやすい。

OSSライセンス関連情報:IPA 独立行政法人 情報処理推進機構

この中で、各ライセンスの比較は以下の資料にまとまっている。(AGPLv3, EUPL, BSD License, Apache License 2.0, MIT License, OpenSSL License などについて記載あり)

OSSライセンスの比較、利用動向および係争に関する調査:IPA 独立行政法人 情報処理推進機構

資料の中で「ライセンシ」「ライセンサ」という単語が登場するが、意味は以下である。

  • ライセンシ ... ライセンスをうける側。OSS を使用する側。
  • ライセンサ ... ライセンスをあたえる側。OSS を提供する側。

MIT, Apache License 2.0 をみてみると

MIT License

IPA の資料から抜粋。

・ライセンシは、OSS を配布する際、ライセンス本⽂および著作権を含めなければならない。

Apache License 2.0

IPA の資料から抜粋。

・ライセンシは、OSS を配布する際、ライセンス本⽂を提供しなければならない。

・ ライセンシは、OSSソースコード形式で配布する際、著作権・特許・商標・帰属63についての告知を添付しなければならない。

・ ライセンシは、OSS に改変を加えて配布する際、改変を加えた事実を分かりやすく告知しなければならない。

・ ライセンシは、オリジナル OSS の NOTICE ファイルに帰属告知が含まれている場合、配布する OSS に同告知を含めなければならない。

・ ライセンサは、配布する OSS に⾃⾝の特許が含まれる場合、ライセンシに対して当該特許を無償でライセンス付与しなければならない。

・ ライセンシが誰かを特許侵害で訴えた場合、ライセンサがライセンシに与えていた特許ライセンスは失効することになる。

・ ライセンサは、配布する OSS に関して、いかなる保証も提供しない。

・ ライセンサは、配布した OSS が引き起こす損害に対して、⼀切の責任を持たない。

MIT はとてもシンプル。ライセンス文章も短い。

Apache License 2.0 はライセンシが改変した時の記載があったり、特許の扱いが決められたり、ランセンサとライセンシの権利を細かく保証している印象がある。

Firebase iOS SDK を使っていると SwiftUI の Preview が機能しない問題(Firebase iOS SDK v6.33.0)

Firebase iOS SDK を使っている SwiftUI のプロジェクトで Preview が表示されなくなった。(Xcode 12.0.1)

とりあえず configure()コメントアウトすれば、Preview は表示される。

// FirebaseApp.configure()

調べたら、この問題について issue が上がっていた。(2020/10/4 現在、修正リリースは出ていないが issue 自体は close されている)

issue の内容を読むと、どうやらこれは v6.33.0 で起きる問題で、その前のバージョン(v6.30.0 とか)では発生しないらしい。なので、前のバージョンを指定してライブラリ追加しておくと、とりあえず回避できる。CocoaPods ならこんな感じ。

pod 'Firebase/Analytics', '6.30.0'

今後は、、
Firebase iOS SDK v6.34.0 のマイルストーンにこの issue はあるので、次のバージョンでは直っている。。。のかな。と。

https://github.com/firebase/firebase-ios-sdk/milestone/70?closed=1

Nominatim(OSM) API を試してみた(iOS)

iOS で Nominatim API の動作モックを作って試してみた。

動作イメージはこんな感じ。

Nominatim は OSM(Open Street Map)のデータからジオコーディングした結果を取得できる API で、たとえば地名から住所(緯度経度)検索ができる。また、緯度経度から地名を取得する逆ジオコーディングの機能も API にある。


以下、2020/9/23 現在の API の感想。(OSM のデータは更新されるため、最新のデータでは状況が変わっているかもしれないので、注意)

良い点

試してみた感じはやはり OSM はデータが膨大なので、結果の候補が多く取得できる。

たとえば「中央区」と検索した時、日本各地の中央区の候補がちゃんと取得できる。

https://nominatim.openstreetmap.org/search?q=%E4%B8%AD%E5%A4%AE%E5%8C%BA&format=json

[
{
"place_id": 235480386,
"licence": "Data © OpenStreetMap contributors, ODbL 1.0. https://osm.org/copyright",
"osm_type": "relation",
"osm_id": 1758897,
"boundingbox": [
"35.6403529",
"35.6966147",
"139.758555",
"139.7931533"
],
"lat": "35.666255",
"lon": "139.775565",
"display_name": "中央区, 東京都, 日本",
"class": "boundary",
"type": "administrative",
"importance": 0.6646376901336712,
"icon": "https://nominatim.openstreetmap.org/images/mapicons/poi_boundary_administrative.p.20.png"
},
{
"place_id": 233767601,
"licence": "Data © OpenStreetMap contributors, ODbL 1.0. https://osm.org/copyright",
"osm_type": "relation",
"osm_id": 358727,
"boundingbox": [
"34.662424",
"34.6953569",
"135.496732",
"135.5355055"
],
"lat": "34.679846",
"lon": "135.510316",
"display_name": "中央区, 大阪府, 日本",
"class": "boundary",
"type": "administrative",
"importance": 0.615352652067619,
"icon": "https://nominatim.openstreetmap.org/images/mapicons/poi_boundary_administrative.p.20.png"
},
★以下略...

]

気を付けたい点

OSM はデータがローカライズはされていたり、されていなかったりが割と多い印象なので

たとえば「Anchorage」では結果が得られるが

https://nominatim.openstreetmap.org/search?q=Anchorage&format=json

[
{
"place_id": 236481643,
"licence": "Data © OpenStreetMap contributors, ODbL 1.0. https://osm.org/copyright",
"osm_type": "relation",
"osm_id": 8867140,
"boundingbox": [
"60.733788",
"61.483938",
"-150.420615",
"-148.460007"
],
"lat": "61.2163129",
"lon": "-149.8948523",
"display_name": "Anchorage, アラスカ州, アメリカ合衆国",
"class": "boundary",
"type": "administrative",
"importance": 0.6801377964834151,
"icon": "https://nominatim.openstreetmap.org/images/mapicons/poi_boundary_administrative.p.20.png"
},

★以下略...

]

「アンカレッジ」では結果が得られない

https://nominatim.openstreetmap.org/search?q=%E3%82%A2%E3%83%B3%E3%82%AB%E3%83%AC%E3%83%83%E3%82%B8&format=json

[]

ということには、気を付けたい。