Xcode プロジェクトにローカルの SwiftPackage を追加する
SwiftPackageManager で配布されているパッケージを、ローカルに持ってきてそれを Xcode プロジェクトで参照して使用するメモ。
- パッケージのリポジトリを clone する。
- 対象のアプリのプロジェクトを開く
- Xcode のプロジェクトツリーに、パッケージのフォルダ(
Package.swiftがあるフォルダ)をドラッグ&ドロップする。- このスクリーンショットの状態になる。
- このスクリーンショットの状態になる。
- ターゲットの
Link Binary With Librariesを開く- 追加の + ボタンをクリックする。
- 対象の Package を選び、追加する。
- 追加の + ボタンをクリックする。
importできるようになっているので、ビルドする。


ローカルで参照したこの状態では Xcode 上でパッケージのコード編集してビルドすると、変更したパッケージの動作を試せるので、パッケージの挙動を試したり、修正することができる。
写真に写っている人・動物をヒエログリフにする iOS アプリを作ってみた
機械学習のフレームワークを使ったアプリを作ってみたくなり、試しに作ってみた。ついでに最近、エジプトのヒエログリフが面白いなあ、と思っていたのでそれをアプリのテーマにした。

Apple の review に提出する際に、かなり機能が単純なアプリだからリジェクトされるかと思ったが、大丈夫だった。
(審査にデモビデオは添付した)
アプリを使って変換すると、こんな感じで写真 → エジプトのヒエログリフの壁画風の画像になる。


アプリの動作はこんな感じ。
精度はそんなに良くなく、たとえば写真全体に人や動物が大きく写っていると、残念ながらうまくいかない。。
ざっくりとした処理の流れは↓の感じ。
- あらかじめ、使用するヒエログリフの画像を作成して用意しておく
- 写真から人や動物を認識する
- 認識した領域にもっとも特徴が近いヒエログリフを探し、該当するヒエログリフで写真を置き換える
- Vision(CoreML) VNFeaturePrintObservation で画像間の特徴の近さが分かる
やってみて悩ましかった点は
多数の画像(ヒエログリフ)から VNFeaturePrintObservation を作ると時間がかかりすぎる。アプリの利用上の障害がある、という問題があった。
解決策としては
- 実行時に特徴検出を逐次作成するのではなく
- あらかじめ、各画像の
VNFeaturePrintObservationを作成しておいてそれを CoreData で DB に保存しておく- そしてそれをアプリにバンドルしておく
- アプリの実行時には作っておいた DB から
VNFeaturePrintObservationを fetch する
という形にした。
VNFeaturePrintObservation の継承元の VNObservation は NSSecureCoding を採用しているので、CoreData の Attribute の型を Transformable にして、下のようなカスタムの Transformer クラスを使用することで CoreData に保存できる。
@objc(VNFeaturePrintObservationTransformer)
class VNFeaturePrintObservationTransformer: NSSecureUnarchiveFromDataTransformer {
    static let name = NSValueTransformerName(rawValue: String(describing: VNFeaturePrintObservationTransformer.self))

    override class var allowedTopLevelClasses: [AnyClass] {
        return super.allowedTopLevelClasses + [VNFeaturePrintObservation.self]
    }

    public static func register() {
        let transformer = VNFeaturePrintObservationTransformer()
        ValueTransformer.setValueTransformer(transformer, forName: name)
    }
}
Google ML Kit や Core ML はほとんど触ったことがなく難しい印象だったが、やってみると楽しかった。
iOS の Google MLKit で静止画像の ObjectDetection を試してみた
Google MLKit の ObjectDetection での静止画像の解析を試してみた。
公式のサンプルもあるが、バンドルされている静止画像しか解析できない。
そのため、写真を選んで解析する iOS サンプル を作ってみた。
動かすとこんな感じ。
試してみて分かったこと
- Firebase のセットアップをしなくても使える
- Google MLKit はもともとは Firebase MLKit という名前だったが
- Firebase ではなくなり、Firebase のセットアップ(
GoogleService-Info.plistの追加など)をしなくても最低限使えるようになったため、とっつきやすい。
- 認識できるオブジェクトの最大数は 5 である
- TensorFlowLite と比べると
- ベースモデル以外にカスタムモデルも使用可能
- カスタマイズされたモデルを使うことも可能なので、拡張性もある。
- カスタマイズモデルの取り込み方法は、以下がある。
- ローカルファイルから読み込む
- Firebase でホスティングされているモデルを読み込む
CocoaPods で「Your project does not explicitly specify the CocoaPods master specs repo...」の警告が出る
pod のコマンドを実行した時、以下の警告が表示されるようになった。
[!] Your project does not explicitly specify the CocoaPods master specs repo.
Since CDN is now used as the default, you may safely remove it from your repos directory via `pod repo remove master`.
To suppress this warning please add `warn_for_unused_master_specs_repo => false` to your Podfile.
警告メッセージのとおりpod repo remove master をするが
% pod repo remove master
[!] repo master does not exist
master リポジトリがない、と返される。
なので、もうひとつメッセージに書いてある warn_for_unused_master_specs_repo => false を Podfile に追加する。
platform :ios, '14.0'
use_frameworks!

install! 'cocoapods',
            :warn_for_unused_master_specs_repo => false

target 'App' do
# ...
end
これで警告メッセージが出なくなる。
現時点でドキュメントに見当たらなかったが warn_for_unused_master_specs_repo は install! のオプションに指定するみたい。
↑の警告と同時に、以下のメッセージが pod コマンド実行時に表示されていた。
Ignoring ffi-1.13.1 because its extensions are not built. Try: gem pristine ffi --version 1.13.1
私の場合 brew で cocoapods をインストールしていたので、試しに
% brew upgrade
をしたら、以後表示されなくなった。
Apple Archive フレームワークを使って LZFSE の CLI ツールを作った
macOS 11.0(Big Sur)、iOS 14 から Apple Archive Framework が使えるようになった。
Apple Archive Framework では Apple によって開発された LZFSE アルゴリズムの圧縮・展開ができる。
試しにこの Apple Archive Framework を使って LZFSE の展開・圧縮の CLI ツールを作ってみた。
(Big Sur 標準の aa コマンドで LZFSE の圧縮・展開ができるが、それのミニバージョンという感じ。)
ツールの使い方は
これでファイルを圧縮できる。(.lzfse ファイルができる)
$ ./lzfse-cli --encode -i alice29.txt
ファイルの展開。
$ ./lzfse-cli --decode -i alice29.txt.lzfse
フォルダの圧縮もできる。(.aar ができる)
$ ./lzfse-cli --encode -i dir
フォルダの展開。
$ ./lzfse-cli --decode -i dir.aar
CLI ツールを作るにあたって、コマンドの引数解析には Swift Argument Parser を使ってみた。
引数パラメータ解析や、エラー処理を独自に実装しなくて良いし、オプション引数も簡単に扱えるので、非常に良い。
macOS Big Sur(macOS 11)からはコマンドで Apple Archive の圧縮・展開ができる。
macOS Big Sur からはコマンドで Apple Archive (aar や lzfse)の圧縮・展開ができるみたい。
以下、コマンドの例。
単体ファイルの圧縮
% aa archive -i alice29.txt -o alice29.txt.lzfse -a lzfse
alice29.txt を圧縮した alice29.txt.lzfse を生成する。
単体ファイルの展開
% aa extract -i alice29.txt.lzfse -o alice29.txt
alice29.txt.lzfse を展開した alice29.txt を生成する。
フォルダの圧縮
% aa archive -D target_dir -o target_dir.aar -a lzfse
target_dir フォルダを圧縮した target_dir.aar を生成する。
フォルダの展開
% aa extract -i target_dir.aar -o target_dir
target_dir.aar を展開した target_dir フォルダ を生成する。
コマンドのオプションなどは、こんな感じ。
% aa
Usage: aa command <options>

Commands:

   archive                    archive the contents of a directory
   extract                    extract files from an archive
   list                       list the contents of an archive
   convert                    convert an archive into another
   manifest                   alias for 'archive -manifest'
   verify                     compare dir contents with manifest
   check-and-fix              check and fix dir contents using manifest

Options:

   -v                         Increase verbosity level to stderr. Default is silent operation
   -h                         Show usage and quit
   -t n_threads               Number of threads to run for compression/decompression,
                              default 8 on this machine
   -wt n_threads              Number of writer threads to run (extract only),
                              default is number of worker threads
   -d dir                     Target directory for archive/extract,
                              default is current directory
   -subdir subdir             Target subdirectory under 'dir', name will be included in the archive
                              default is empty
   -D dir_and_subdir          Defines both 'dir' (dirname) and 'subdir' (basename)
   -i input_file              Input file, default is stdin
   -o output_file             Output file, default is stdout
   -a algorithm               Algorithm for archive compression, one of lzfse, lzma, zlib, lz4, raw (no compression),
   -b block_size              Blocks size for archive compression, integer with an optional suffix b, k, m, g
                              default compression options for archive: -a lzfse -b 4m
                              default compression options for other commands: -a lzfse -b 1m
   -enable-dedup (-no-enable-dedup)
                              If set, and SLC fields are present in the archive,
                              files with same data will be extracted as clones
                              Default is -no-enable-dedup
   -enable-holes (-no-enable-holes)
                              If set, and the filesystem supports it, detect and create
                              holes in files to store 0-filled segments
                              Default is -no-enable-holes
   -ignore-eperm (-no-ignore-eperm)
                              If set, ignore EPERM (operation not permitted) errors when setting files attributes
                              Default is -ignore-eperm
   -manifest                  Alias for the following options:
                              -exclude-field dat
                              -include-field sh1,cks,siz
                              -a lzfse -b 1m
   -list-format format        Output format for list, one of text, json                              default is text

Entry selection:

   -include-path path         Include entries matching `path`
   -exclude-path path         Exclude entries matching `path`
   -include-path-list file    File containing a list of paths to include with -include-path
                              (one per line, empty lines ignored)
   -exclude-path-list file    File containing a list of paths to exclude with -exclude-path
                              (one per line, empty lines ignored)
   -include-regex expr        Include entries matching `expr` (regex(3) syntax)
   -exclude-regex expr        Exclude entries matching `expr` (regex(3) syntax)
   -exclude-name name         Exclude entries with a path component equal to `name`

                              All the options above can be specified multiple times


Archive fields:

   -include-field fields      Add `fields` to the field key set
   -exclude-field fields      Remove `fields` from the field key set

                              `fields` is a comma separated list of fields, listed below
                              These options can be specified multiple times

   typ                        entry type (always included)
   pat                        entry path (always included for filesystem objects)
   lnk                        link path (always included for symbolic links)
   dev                        device id (always included for block/character devices)
   uid                        user id
   gid                        group id
   mod                        access mode
   flg                        BSD flags
   mtm                        modification time
   btm                        backup time
   ctm                        creation time
   dat                        file data
   siz                        file data size
   cks                        file data digest, POSIX 1003.2-1992 32 bit CRC
   sh1                        file data SHA-1 digest
   sh2                        file data SHA-256 digest
   sh3                        file data SHA-384 digest
   sh5                        file data SHA-512 digest
   xat                        extended attributes
   acl                        access control list
   duz                        file disk usage
   idx                        entry index in input archive
   yec                        file data error correcting codes
   yaf                        list of archive fields (metadata entry)
   attr                       alias for uid,gid,mod,flg,mtm,btm,ctm
   all                        alias for all fields (exclude only)

Entry types:

   -include-type types        Include only entries matching `types`
   -exclude-type types        Include only entries not matching `types`

                              `types` is a string including one or more of the characters below

   b                          block special
   c                          character special
   d                          directory
   f                          regular file
   h                          hard link
   l                          symbolic link
   m                          metadata entry (not a filesystem object)
   p                          fifo
   s                          socket
SwiftUI キーボードを表示時に特定の View を非表示にする
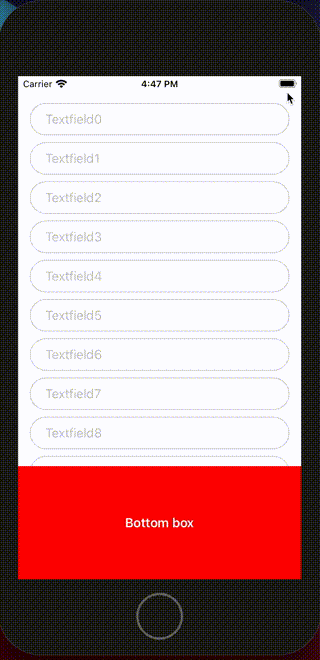
たとえばこんなコードで ScrollView 内に TextField を置いて、さらにスクロール位置によらないで常に画面下部にある View が表示されるような構成を ZStack で表現すると
import SwiftUI

struct ContentView: View {
    @State private var text: String = ""
    let bottomBoxHeight: CGFloat = 150

    var body: some View {
        ZStack {
            ScrollView(.vertical, showsIndicators: true) {
                VStack {
                    ForEach(0..<20) { (i) in
                        TextField("Textfield\(i)", text: $text)
                            .padding(EdgeInsets(top: 10, leading: 20, bottom: 10, trailing: 33))
                            .overlay(
                                RoundedRectangle(cornerRadius: 30)
                                    .stroke(Color(.systemGray3), lineWidth: 1)
                            )

                        Spacer()
                            .frame(height: 10)
                    }

                    Spacer()
                        .frame(height: bottomBoxHeight)
                }.padding()
            }

            VStack {
                Spacer()

                Group {
                    Text("Bottom box")
                        .font(.headline)
                        .foregroundColor(.white)
                }
                .frame(minWidth: 0, idealWidth: .infinity, maxWidth: .infinity,
                       minHeight: 0, idealHeight: bottomBoxHeight, maxHeight: bottomBoxHeight,
                       alignment: .center)
                .background(Color(.red))
            }
        }
    }
}
こういうふうに TextField のキーボードを開いた時に、キーボード上に View が重なってしまい、TextField が見えなくなってしまう。(入力できない)
キーボードを表示した時に特定の View を非表示にできれば解決しそう、と考えて調べてみると
KeyboardObserving というライブラリがあり、これを使って対応できた。
https://github.com/nickffox/KeyboardObserving
使い方は、まずアプリのエントリで最初の View を表示する部分のコードで .environmentObject(Keyboard()) を追加する。
(これをしないと、このあと追加するコードでクラッシュする)
import SwiftUI

import KeyboardObserving

@main
struct SwiftUIHideOnKeyboardSampleAppApp: App {
    var body: some Scene {
        WindowGroup {
            ContentView()
                .environmentObject(Keyboard())    // これを追加
        }
    }
}
あとは問題が起きている View に以下を追加する。
ScrollView(.vertical, showsIndicators: true) {
    KeyboardObservingView { // KeyboardObservingView にキーボード表示を監視したい View を追加する
        VStack {
            // .... 中略 ....
        }.padding()
    }
}

// .... 中略 ....

VStack {
    // .... 中略 ....
}
.hideOnKeyboard()    // キーボードを表示した時に非表示にしたい View に .hideOnKeyboard() を追加する
これでキーボード表示時に、TextField が隠されることは無くなった。

今回の記事の完全なコードは GitHub にある。
https://github.com/daisuke-t-jp/SwiftUIHideOnKeyboardSampleApp