GCVirtualController は iOS 15 から使用できるソフトウェアゲームコントローラー。
これを使うことで、アプリで自作のゲームコントローラーを作成しなくてよい、というメリットがある。
GCVirtualController - Apple Developer
アプリを作る際に GCVirtualController を触ってみて、わかったことを以下にまとめる。
バーチャルコントローラーを作成する
コントローラー作成の簡単なコードが以下になる。
import UIKit
import GameController

class ViewController: UIViewController {

    private var virtualController: GCVirtualController!

    override func viewDidLoad() {
        super.viewDidLoad()

        let config = GCVirtualController.Configuration()
        config.elements = [
            GCInputDirectionPad,
            GCInputButtonA,
            GCInputButtonB,
        ]
        self.virtualController = GCVirtualController(configuration: config)

        self.virtualController.connect { error in
            if let error = error {
                print(error)
            }
        }
    }

    override func viewWillDisappear(_ animated: Bool) {
        super.viewWillDisappear(animated)

        self.virtualController.disconnect()
    }

}
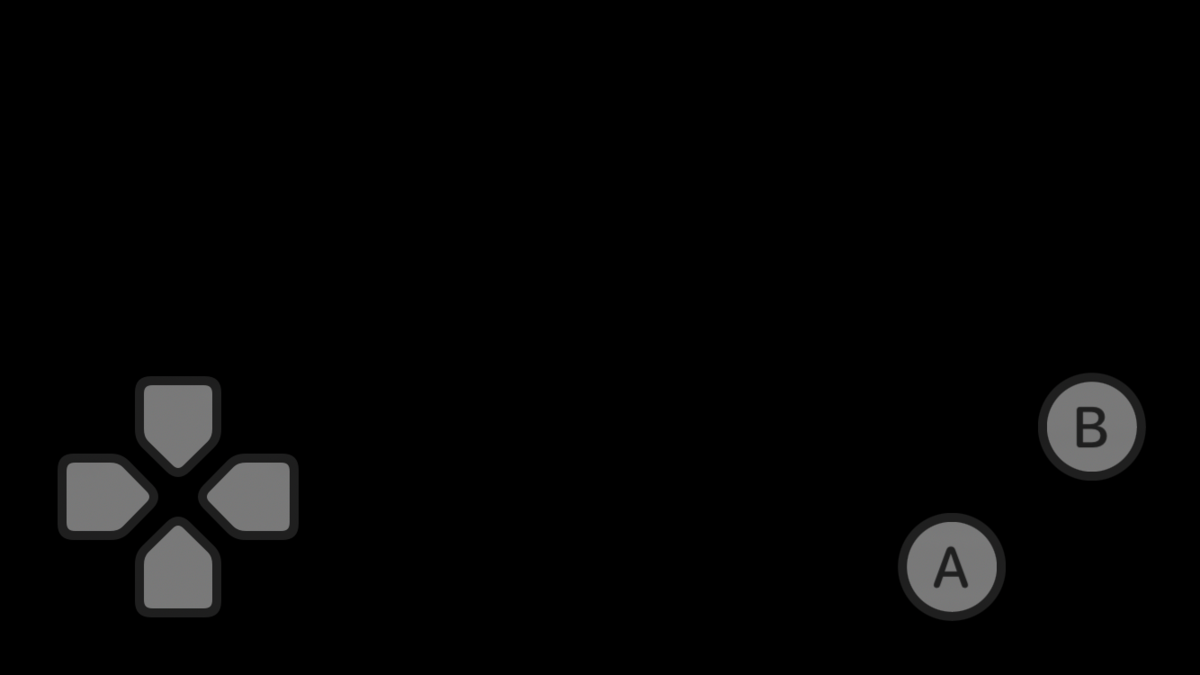
これを実行すると、このようにボタンが表示される。
使えるボタンの種類はここに書いてあり、 https://developer.apple.com/documentation/gamecontroller/gcvirtualcontroller/configuration/3752038-elements
以下が使えるボタンのようだ。
- GCInputButtonA
- GCInputButtonB
- GCInputButtonX
- GCInputButtonY
- GCInputDirectionPad
- GCInputLeftThumbstick
- GCInputRightThumbstick
- GCInputLeftShoulder
- GCInputRightShoulder
- GCInputLeftTrigger
- GCInputRightTrigger
ボタンの入力を知りたい
以下のようにボタンに valueChangedHandler を設定することで、「ボタンが押された」を取得することができる。
        if let dpad: GCControllerDirectionPad = self.virtualController.controller?.extendedGamepad?.dpad {
            dpad.valueChangedHandler = { (dpad: GCControllerDirectionPad, xValue: Float, yValue: Float) in
                if dpad.up.isPressed {
                    print("↑")
                }
                if dpad.down.isPressed {
                    print("↓")
                }
                if dpad.left.isPressed {
                    print("←")
                }
                if dpad.right.isPressed {
                    print("→")
                }
            }
        }

        if let buttonA: GCControllerButtonInput = self.virtualController.controller?.extendedGamepad?.buttonA {
            buttonA.valueChangedHandler = { (button: GCControllerButtonInput, value: Float, pressed: Bool) in
                if buttonA.isPressed {
                    print("A")
                }
            }
        }

        if let buttonB: GCControllerButtonInput = self.virtualController.controller?.extendedGamepad?.buttonB {
            buttonB.valueChangedHandler = { (button: GCControllerButtonInput, value: Float, pressed: Bool) in
                if buttonB.isPressed {
                    print("B")
                }
            }
        }
valueChangedHandler は「ボタンが押された」だけでなく「ボタンが離された」タイミングでも呼ばれるため、どのボタンが離されたかも判断できる。
また valueChangedHandler を使わずに Timer などで周定期で各ボタンの isPressed を確認してボタン状態を得ることもできる。
(たとえば、「Nフレームボタンが押されたら」という処理がしたい場合は、周定期でボタン状態を監視することになる)
ボタンの見た目・位置は変えれるか?
ボタンの要素は ElemntConfiguration で変更できる。
これを見ると
- ボタンの位置は変えられない。
- ボタンの位置、大きさはそのままに、中の表示を
UIBezierPathで変更することはできる。
ボタンの見た目の変更は、たとえば以下のコードで
        self.virtualController.updateConfiguration(forElement: GCInputButtonA, configuration: { _ in
            let elementConfiguration: GCVirtualController.ElementConfiguration = GCVirtualController.ElementConfiguration()

            elementConfiguration.path = UIBezierPath()

            let bezierPath: UIBezierPath = UIBezierPath()
            bezierPath.move(to: CGPoint(x: 0, y: 0))
            bezierPath.addLine(to: CGPoint(x: -10, y: -10))
            bezierPath.addLine(to: CGPoint(x: 10, y: -10))
            bezierPath.addLine(to: CGPoint(x: 10, y: 10))
            bezierPath.addLine(to: CGPoint(x: -10, y: 10))
            bezierPath.close()

            elementConfiguration.path?.append(bezierPath)

            return elementConfiguration
        })
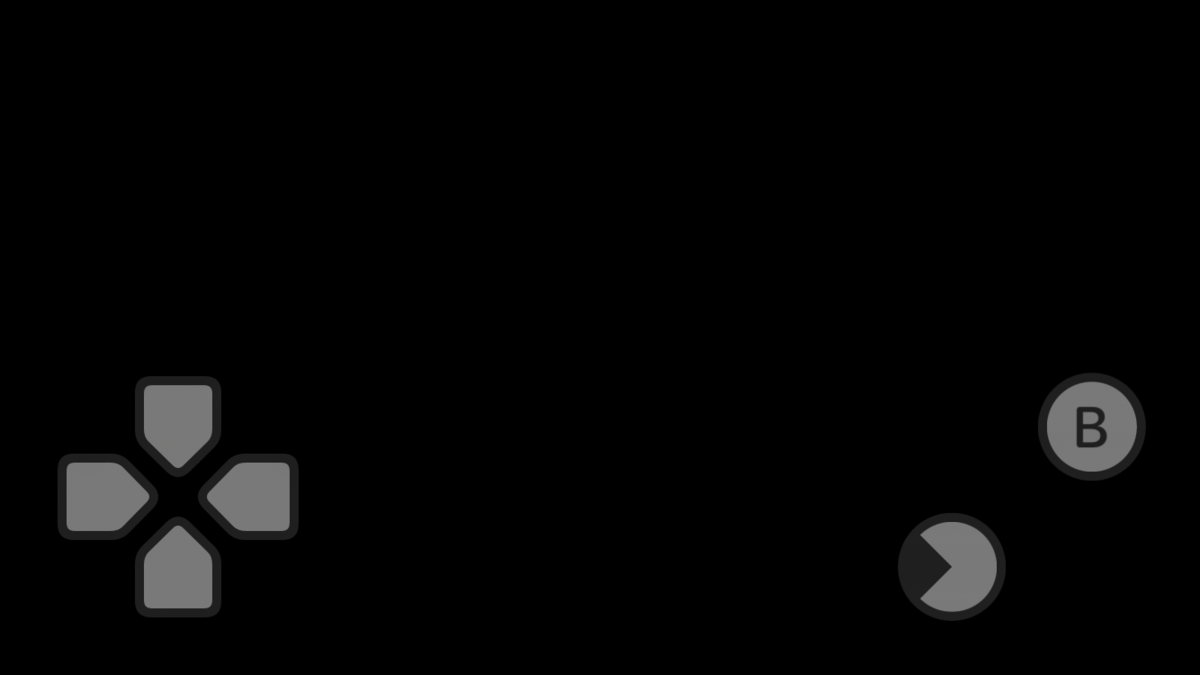
このように A ボタンの見た目が、パックマンに変わる。
各ボタンは途中で非表示にできるか?
ElementConfiguration の isHidden で非表示にすることができる。
たとえば、 A ボタンを押したら B ボタンを非表示にするコードは以下だ。
        if let buttonA: GCControllerButtonInput = self.virtualController.controller?.extendedGamepad?.buttonA {
            buttonA.valueChangedHandler = { (button: GCControllerButtonInput, value: Float, pressed: Bool) in
                if buttonA.isPressed {
                    self.virtualController.updateConfiguration(forElement: GCInputButtonB, configuration: { _ in
                        let elementConfiguration: GCVirtualController.ElementConfiguration = GCVirtualController.ElementConfiguration()
                        elementConfiguration.isHidden = true
                        return elementConfiguration
                    })
                }
            }
        }
B ボタンが非表示になると見た目がこうなる。

ちなみに最初から B ボタンがない(GCVirtualController の init(configuration:) の時点で B ボタンの要素を含めない)場合は、見た目がこうなる。

上の2つのボタン配置位置が違うことから
- 最初からボタンがない場合
- 途中でボタンを非表示にした場合
はそれぞれ配置が異なることがわかるので、注意したい。
(途中でボタンを非表示にしても、その分、配置が詰められる訳ではない)
もし、ボタンを非表示にして、かつボタン配置も最初からボタンがないものと同じにしたい場合は、GCVirtualController init(configuration:) でバーチャルコントローラー自体を作り直せば良い。
おわり
↑のようにいろいろ GCVirtualController を調べて作ったゲームがあったりしますよ。
